Reflectors are simple but powerful tools for outdoor portrait photography. They help you manage natural sunlight to make your subject look better by reducing shadows, adding brightness, and even giving a warm glow when needed. Think of them as tools that bounce light from the sun back onto your subject’s face, making the image look softer, brighter, and more professional. Mastering Reflectors and outdoor portrait photography alongside the right techniques can elevate your photography game.
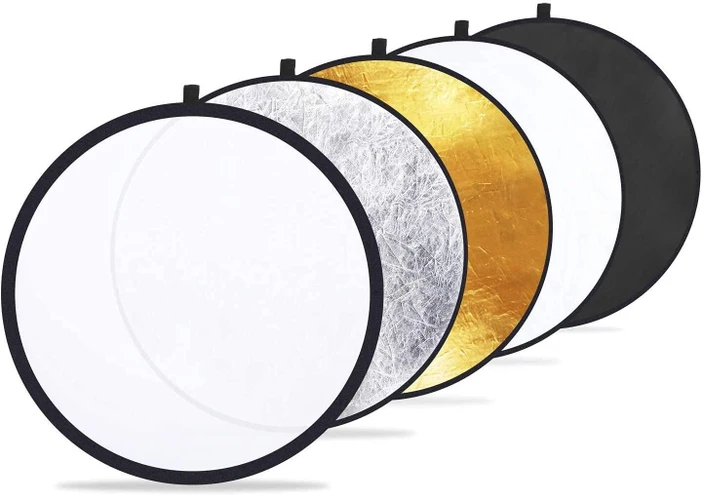
Most reflectors come in a “5-in-1” design, meaning they offer different surfaces for different lighting effects. The white side reflects soft, neutral light, which is great for gently brightening up shadows on the face. The silver side reflects a stronger, more intense light, useful for dull or cloudy days. The gold side adds a warm tone to the light, which can make skin tones look healthier and mimic golden hour lighting. The black side isn’t used to reflect light, but rather to block it. It helps deepen shadows and add contrast for a more dramatic look. The translucent surface in the middle is used to soften harsh sunlight, like a big diffuser — perfect for mid-day shoots when the sun is directly overhead.
Understanding the role of Reflectors and outdoor portrait photography is essential for photographers aiming to enhance their work.
To use a reflector outdoors, the most common method is to use it to fill in shadows. If the sun is casting dark areas under the eyes or nose, you can hold the reflector on the opposite side of the sun to bounce light back into those areas. You can move the reflector closer or farther to control how strong the light is. Sometimes the subject can even hold it themselves just out of frame, especially in tight shots.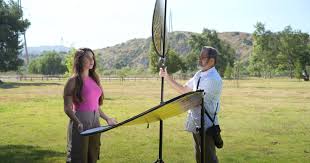
Another great technique is shooting with the sun behind your subject to get a glowing edge of light around their hair and shoulders — this is called backlighting. A reflector in front of the subject will bounce light onto their face so it doesn’t get lost in shadow. This is especially beautiful during sunrise or sunset when the sunlight is golden and soft.
If you’re shooting in bright sunlight, like at noon, and the light is too harsh, you can use the translucent part of the reflector as a shade. Hold it between the sun and your subject to turn harsh light into soft, even lighting on the face. It acts like a portable softbox, making your subject look better without needing extra gear.
The gold side is best for warm tones, while the silver side is good when you want a more polished, dramatic look. Be careful, though — silver can be strong in bright sun. If you’re going for a more serious or moody photo, you can use the black side to block light and create deeper shadows.
 Using a reflector well takes a bit of practice. The distance, angle, and type of reflector all make a difference. The closer you place it, the stronger and softer the light will be. You can use an assistant to hold the reflector, or get a stand if you’re shooting alone. Also, watch for catchlights — those bright reflections in the subject’s eyes — as they bring a portrait to life.
Mastering the use of reflectors in outdoor portrait photography gives you creative control over natural light. With practice, you can enhance skin tones, reduce shadows, and add depth, all without costly gear. Whether softening sunlight or creating dramatic effects, reflectors are essential tools for capturing professional, eye-catching portraits outdoors. Overall, a reflector gives you more control over natural light without needing expensive equipment. It’s an easy way to make your portraits look brighter, cleaner, and more professional.